WPAN support for netifd

netifd is an RPC-capable daemon written in C for better access to kernel APIs with the ability to listen on netlink events. Netifd has replaced the old OpenWrt-network configuration scripts, the actual scripts that configured the network e.g.,

/lib/network/.sh
/lib/netifd/proto/
.sh
/sbin/ifup
/sbin/ifstatus
/sbin/devstatus
/etc/init.d/network
/etc/hotplug.d/*

The WPAN support is now a simple clone of 802.11 support which include C code for netifd and Ash scripts to handle wpan interface.

The hardware platform I use is ci40 from Imagination, which has ca2810 802.15.4 radio chip. For most router without 802.15.4 hardware chips, fakelb is a good choice for testing. here is a simple tutorial how to setup a 6lowpan test network.

The OpenWRT source code is here

iwpaninfo: Bring 802.15.4 into OpenWRT/LEDE

During last few days I have worked on a new project called iwpaninfo. It is a “clone” project from iwinfo and designed for 802.15.4 protocol. It is a wrap program like wpan-tools but it only read 802.15.4 device information via nl802154 interface. It also provides Lua bindings.

WIth the help of this project the intergration of 802.15.4 into OpenWRT/LEDE project will become easier.

Projects:
iwpaninfo
iwpaninfo-feed

[802.15.4 Linux] Add BEE click board support for Ci40

This post will briefly introduces how to add support of BEE click board for IMG ci40 board.

BEE Click is an accessory board in mikroBUS form factor. It features 2.4 GHz IEEE 802.15.4 radio transceiver module MRF24J40MA. This module includes an integrated PCB antenna and matching circuitry and is connected to the microcontroller via a SPI interface. As such, this module is an ideal solution for wireless networks, smart home automation, building automation and other electronic applications that need wireless communication. Board is designed to use 3.3V power supply only.

ci40 Linux kernel (4.4.14) has already driver support for MRF24J40. What we should do is adding device tree config for it, like

    mrf24j40ma@0 {
        compatible = "microchip,mrf24j40ma", "microchip,mrf24j40";
        spi-max-frequency = <4000000>;
        reg = <2>;
        interrupt-parent = <&gpio1>;
        interrupts = <5 GPIO_ACTIVE_HIGH>;
    };

Or you can find the patch here.

It is noted that current driver has no support for reset and wake pin. And a pending patch is not merged. Since ci40 board has already 802.15.4 support via ca8210. mrf24j40 driver will be not automatically activated but explicitly loaded mrf24j40 driver via modprobe or insmod.

References:
https://shop.mikroe.com/click/wireless-connectivity/bee

[802.15.4 Linux] MCR20A Driver is Comming

The MCR20A expands the NXP® portfolio of wireless connectivity products by delivering a new generation of 2.4 GHz transceiver for the IEEE® 802.15.4 standard. The MCR20A provides a world-class link budget of 110 dB that ensures the longest range of communication. At the same time, the MCR20A is able to receive and transmit at significantly lower peak currents than other competitive devices. This enables mesh networks to run on the same battery for a much longer period. The Dual PAN support allows the system to concurrently participate in two 802.15.4 networks, eliminating the need for multiple radios.

  • High-performance 2.4 GHz IEEE 802.15.4 RF transceiver
  • 802.15.4 PHY/MAC support
  • -102 dBm sensitivity +8 dBm maximum output power reducing the need for external power amplifiers
  • Low-power receive mode (LPPS)
  • TX 17 mA @ 0 dBm and RX 19 mA typical
  • TX 18 mA @ 0 dBm and RX 19.5 mA max
  • Dual PAN support
  • Supports single-ended and fast diversity antenna options: single 50 ohm antenna uses single balun to reduce component count and cost
  • Packet processor for hardware acceleration
  • 128-bit random number generator
  • 1.8-3.6 V operating range
  • Small footprint: 5×5 LGA 32 pin
  • –40 ˚C to +105 ˚C operational temperature range
  • Supports SMAC, Thread Networking Protocol and ZigBee stacks

The MCR20A Linux driver is coming soon. link

Update: 16.02.2017
* Support only one PAN network

“New OpenWRT Series” #1: Setting up OpenWRT (Chaos Calmer) for Arduino Yún

The latest OpenWRT release (Chaos Calmer) has already there for a long time. It ships with Linux kernel version 3.8.21 which supports 6LowPAN via Bluetooth Low Energy (BLE). Both of them features Open WRT routers as a very good solution for the Nordic IoT SDK. This made the developers easier to consider IPv6 in BLE solutions.

The Arduino Yún is a microcontroller board based on the ATmega32u4 and the MIPS @400MHz Atheros AR9331, 64 MB RAM and 16 MB FLASH. The Atheros processor supports a Linux distribution based on OpenWrt named OpenWrt-Yun. The board has built-in Ethernet and WiFi support, a USB-A port, micro-SD card slot, 20 digital input/output pins (of which 7 can be used as PWM outputs and 12 as analog inputs), a 16 MHz crystal oscillator, a micro USB connection, an ICSP header, and a 3 reset buttons.

This blog series will summery the procedures of setting up 6LowPAN via BLE using OpenWRT and Arduino Yún. The first one will introduce how to flash a new firmware from web panel (Luci).

The version of the official OpenWRT named OpenWRT-Yun is 12.09 Attitude Adjustment and it has not been updated for a very long time.  But we should thanks RedSnake64 who brings third-party Chaos Calmer support for Arduino Yún. Though not all the software packages from OpenWRT-Yun can work property, it is still enough for our test for 6LowPAN BLE.

Before we start, we should firstly introduce the hardwares:

  1. Arduino  Yún
  2. BLE USB doggle
  3. nRF 52 DK


The firmware flashing procedures are more or less the same with installing OpenWRT in router. They involve downloading the OpenWRT image, flashing the image via webpage or U-Boot. You can also extend the root file system with the SD card later.

1. Getting image from GitHub

The firmware of Chao Calmer 15.05 for Arduino Yún is avaiable for download at https://github.com/RedSnake64/openwrt-yun/releases. The latest version is 1.2 when I write this blog. Please download the binary file with sysupgrade. By using the sysupgrade image your configurations can be reserve.

2. Flashing the image vie web panel

The default WiFi mode is AP which you could connect it as a WiFi client. But in such situation. Neither your computer and Arduino Yún can not connect the Internet. Therefore at first we should config the Arduino Yún in Client mode and connect your WiFi router.

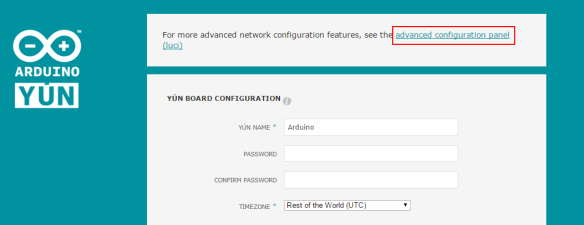
2.1 Following Start Guide to configurate the Arduino Yun as WiFi client and log in;

2.2 Clicking CONFIGUARATION button;

arduino_yun_webpage_index.png

2.3 Clicking advanced configuration panel (luci) on the top;

arduino_yun_webpage_configuration.png


2.4 Selecting System -> Backup / Flashing Firmware;

arduino_yun_web_flash_firmware.png

2.5 Clicking Choose File to select the downloaded firmware and clicking Flash image … in the subsection Flash new firmware image;

arduino_yun_web_firmware_and_flash.png

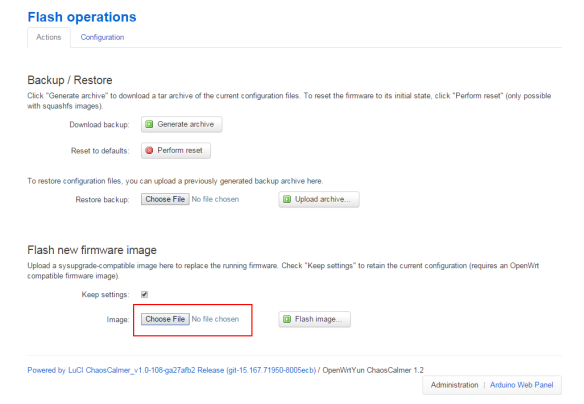
2.6 After uploading the firmware the calculating the checksum, clicking the Proceed button to start the flashing procedure;

arduino_yun_web_flash_firmware_final.png

2.7 Have a coffee and waiting for about 5 min;

2.8 Login the Arduino Yún and checking the firmware version;

arduino_yun_web_firmware_check.png

References:

  1. https://devzone.nordicsemi.com/blogs/698/openwrt-series-1-setting-up-tp-link-wdr4300-or-n75/
  2. https://devzone.nordicsemi.com/blogs/663/6lowpan-for-bluetooth-low-energy-on-openwrt/
  3. https://developer.nordicsemi.com/nRF5_IoT_SDK/doc/0.9.0/html/a00089.html
  4. https://wiki.openwrt.org/doc/howto/bluetooth.6lowpan
  5. https://github.com/RedSnake64/openwrt-yun

IEEE 802.15.4 for Linux 详解 (WPAN设备注册和初始化)

在这章所说的设备注册和初始化是指WPAN网络设备的注册和初始化,而不是SPI总线设备的设备注册。下面这张图表示CC2420 probe函数中如何注册WPAN的过程。

image

下面详细讲解每个函数的作用:

1. IEEE 802.15.4_alloc_device

   1: struct ieee802154_dev *ieee802154_alloc_device(size_t priv_size,
   2:         struct ieee802154_ops *ops)
   3: {
   4:     struct wpan_phy *phy;
   5:     struct ieee802154_priv *priv;
   6:  
   7:     phy = wpan_phy_alloc(ALIGN(sizeof(*priv), NETDEV_ALIGN) + priv_size);    // 给wpan_phy结构分配空间
   8:     if (!phy) {
   9:         printk(KERN_ERR "Failure to initialize master IEEE802154 devicen");
  10:         return NULL;
  11:     }
  12:  
  13:     priv = wpan_phy_priv(phy);
  14:     priv->hw.phy = priv->phy = phy;    // private数据和ieee802154_dev数据中wpan_phy初始化为相同的phy
  15:  
  16:     priv->hw.priv = (char *)priv + ALIGN(sizeof(*priv), NETDEV_ALIGN);
  17:  
  18:     BUG_ON(!ops);
  19:     BUG_ON(!ops->xmit);
  20:     BUG_ON(!ops->ed);
  21:     BUG_ON(!ops->start);
  22:     BUG_ON(!ops->stop);
  23:  
  24:     priv->ops = ops;    // 芯片驱动所对应的操作
  25:  
  26:     INIT_LIST_HEAD(&priv->slaves);
  27:     mutex_init(&priv->slaves_mtx);
  28:  
  29:     return &priv->hw;
  30: }
  31: EXPORT_SYMBOL(ieee802154_alloc_device);

2. IEEE 802.15.4_register_device

   1: int ieee802154_register_device(struct ieee802154_dev *dev)
   2: {
   3:     struct ieee802154_priv *priv = ieee802154_to_priv(dev);
   4:     int rc;
   5:  
   6:     priv->dev_workqueue =
   7:         create_singlethread_workqueue(wpan_phy_name(priv->phy));
   8:     if (!priv->dev_workqueue) {
   9:         rc = -ENOMEM;
  10:         goto out;
  11:     }
  12:  
  13:     wpan_phy_set_dev(priv->phy, priv->hw.parent);
  14:  
  15:     priv->phy->add_iface = ieee802154_add_iface;    /* net_device在这个函数里初始化 */
  16:     priv->phy->del_iface = ieee802154_del_iface;
  17:  
  18:     rc = wpan_phy_register(priv->phy);    /* 注册WPAN物理层设备,实际上就是注册一个设备 
  19:                                                     device_add(&phy->dev);*/
  20:     if (rc < 0)
  21:         goto out_wq;
  22:  
  23:     return 0;
  24:  
  25: out_wq:
  26:     destroy_workqueue(priv->dev_workqueue);
  27: out:
  28:     return rc;
  29: }
  30: EXPORT_SYMBOL(ieee802154_register_device);
3. ieee802154_add_iface
   1: struct net_device *ieee802154_add_iface(struct wpan_phy *phy, const char *name, int type)
   2: {
   3:     struct net_device *dev;
   4:     int err = -ENOMEM;
   5:  
   6:     /* 根据设备工作模式来初始化net_dev结构 */
   7:     switch (type) {
   8:     case IEEE802154_DEV_WPAN:
   9:         dev = alloc_netdev(sizeof(struct ieee802154_sub_if_data),
  10:                 name, ieee802154_wpan_setup);
  11:         break;
  12:     case IEEE802154_DEV_MONITOR:
  13:         dev = alloc_netdev(sizeof(struct ieee802154_sub_if_data),
  14:                 name, ieee802154_monitor_setup);
  15:         break;
  16:     default:
  17:         dev = NULL;
  18:         err = -EINVAL;
  19:         break;
  20:     }
  21:     if (!dev)
  22:         goto err;
  23:  
  24:     err = ieee802154_netdev_register(phy, dev);    /* 注册IEEE 802.15.4 网络设备 */
  25:  
  26:     if (err)
  27:         goto err_free;
  28:  
  29:     dev_hold(dev); /* we return a device w/ incremented refcount */
  30:     return dev;
  31:  
  32: err_free:
  33:     free_netdev(dev);
  34: err:
  35:     return ERR_PTR(err);
  36: }

IEEE 802.15.4 for Linux 详解 (MAC层数据结构)

IEEE802.15.4-2003 specification
1. IEEE 802.15.4的硬件地址过滤,用于侦听特定的地址
   1: struct ieee802154_hw_addr_filt {
   2:     u16 pan_id;
   3:     u16 short_addr;
   4:     u8 ieee_addr[IEEE802154_ADDR_LEN];
   5:     u8 pan_coord;
   6: };

2. IEEE 802.15.4 设备结构

   1: struct ieee802154_dev {
   2:     /* filled by the driver */
   3:     int    extra_tx_headroom;    /* headroom to reserve for tx skb */
   4:     u32    flags;                /* Flags for device to set */
   5:     struct device *parent;
   6:  
   7:     /* filled by mac802154 core */
   8:     struct ieee802154_hw_addr_filt hw_filt;
   9:     void    *priv;                /* driver-specific data */
  10:     struct wpan_phy *phy;
  11: };

3. IEEE 802.15.4 设备驱动要实现的接口

   1: struct ieee802154_ops {
   2:     struct module    *owner;
   3:     int        (*start)(struct ieee802154_dev *dev);
   4:     void       (*stop)(struct ieee802154_dev *dev);
   5:     int        (*xmit)(struct ieee802154_dev *dev, struct sk_buff *skb);
   6:     int        (*ed)(struct ieee802154_dev *dev, u8 *level);
   7:     int        (*set_channel)(struct ieee802154_dev *dev, int channel);
   8:     int        (*set_hw_addr_filt)(struct ieee802154_dev *dev, struct ieee802154_hw_addr_filt *filt, unsigned long changed);
   9: };
  1. start: 设备初始化的时候会调用,这个函数在挂上第一个接口前调用。
  2. stop: 设备退出,清理时调用,这个函数在移除最有一个接口后调用。
  3. xmit: 当发送数据帧时802.15.4模块将会调用这个函数,skb包含从IEEE 802.15.4头(head)开始的数据。底层驱动应该根据当前的配置来发送数据帧。
  4. ed: 802.15.4模块用来完成"Energy Detection"操作。
  5. set_channel: 设置信道用于监听特定的信道。
  6. set_hw_addr_filt: 设置芯片的硬件过滤,用于侦听特定的地址。

4. IEEE 802.15.4 设备的private数据

   1: struct ieee802154_priv {
   2:     struct ieee802154_dev    hw;
   3:     struct ieee802154_ops    *ops;
   4:  
   5:     struct wpan_phy *phy;
   6:  
   7:     int open_count;
   8:     /* As in mac80211 slaves list is modified:
   9:      * 1) under the RTNL
  10:      * 2) protected by slaves_mtx;
  11:      * 3) in an RCU manner
  12:      *
  13:      * So atomic readers can use any of this protection methods
  14:      */
  15:     struct list_head    slaves;
  16:     struct mutex        slaves_mtx;
  17:     /* This one is used for scanning and other
  18:      * jobs not to be interfered with serial driver */
  19:     struct workqueue_struct    *dev_workqueue;
  20: };

5. IEEE 802.15.4 sub interface 数据

   1: struct ieee802154_sub_if_data {
   2:     struct list_head list; /* the ieee802154_priv->slaves list */
   3:  
   4:     struct ieee802154_priv *hw;
   5:     struct net_device *dev;
   6:  
   7:     int type;
   8:  
   9:     spinlock_t mib_lock;
  10:  
  11:     u16 pan_id;
  12:     u16 short_addr;
  13:  
  14:     u8 chan;
  15:     u8 page;
  16:  
  17:     /* MAC BSN field */
  18:     u8 bsn;
  19:     /* MAC BSN field */
  20:     u8 dsn;
  21: };